Two different PCBs with SMT assembly, in the same panel.
91 8
Tone Electronix 1 month ago
Hello good people! I need some help getting this working, because as of now I can't get around this issue. I have a PCB designed according to a schematic, but I also designed an "Auxiliary" PCB that is connected to the Main PCB through PH connectors. Like this: Top PCB: Main Bottom PCB: Auxiliary (made it from scratch, is not included in the Main schematic) ![image.png](//image.easyeda.com/pullimage/ZkhIwYpW3bCKIs2LS5QqykDpR020vEf3VdCJaDVR.png) 
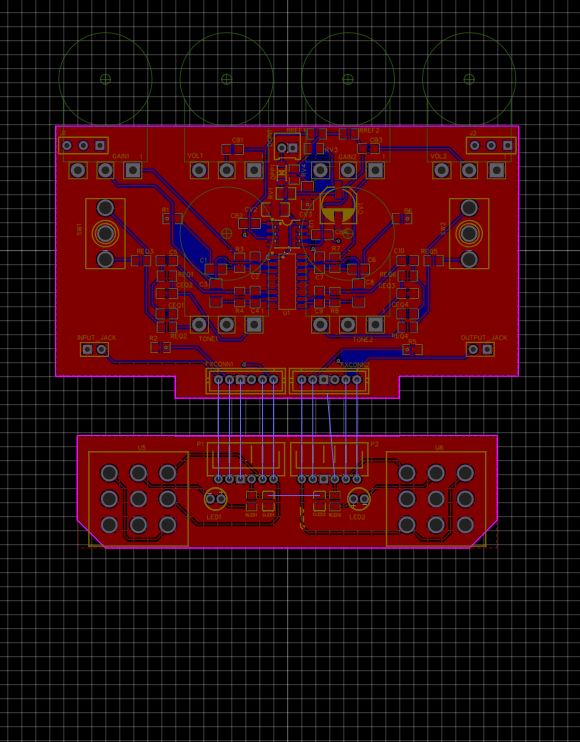
So I want to connect those two PCBs with a V-Cut or Stamp-hole so I can order all of this in one go. I contacted JLCPCB online support, they told me I had to Panelize and ONLY use STAMP-HOLE, because V-cut + SMT assembly isn't supported. So I did the Panelization, and I got this instead: ![1.png](//image.easyeda.com/pullimage/YW851hjgo1du47w5veIIABlZtn18aFWVRKuKBJa4.png) 
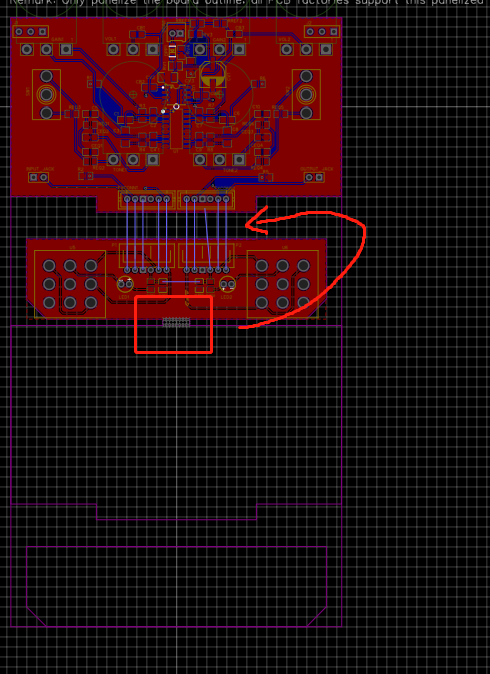
As you can see, the Stamp-hole is in the wrong position, It should connect both PCBs at the point I marked. I can't move (or dont know how) the stamp-hole to go between PCBs. What am I doing wrong? Please help. Thank you!
Komentáře
andyfierman 1 month ago
Can you make your project - or a dummy one that illustrates the issue - public?
Odpovědět
andyfierman 1 month ago
Try rotating the lower PCB by 180 degrees then move it up so that the long, straight edges of both PCBs can be separated by one set of stamp holes.
Odpovědět
Tone Electronix 1 month ago
@andyfierman Please accept this invite: <input class="eda-input-inner workboard eda-input-group-addon-before" type="text" value="https://easyeda.com/join?type=project&key=267aa9cc6b227d3e970c9134ce536942&inviter=16a5abc77b17444a811b88614641240c"><br> <br> [https://easyeda.com/join?type=project&key=267aa9cc6b227d3e970c9134ce536942&inviter=16a5abc77b17444a811b88614641240c](https://easyeda.com/join?type=project&key=267aa9cc6b227d3e970c9134ce536942&inviter=16a5abc77b17444a811b88614641240c)
Odpovědět
Tone Electronix 1 month ago
Sorry:this one: [https://easyeda.com/join?type=project&key=e91a069b922a24f912a090728a2baad3&inviter=16a5abc77b17444a811b88614641240c](https://easyeda.com/join?type=project&key=e91a069b922a24f912a090728a2baad3&inviter=16a5abc77b17444a811b88614641240c)
Odpovědět
Tone Electronix 1 month ago
@andyfierman Tried rotating 180º. No good. ![image.png](//image.easyeda.com/pullimage/IcymKo8f42BtumN8koJUBLqO2iQZhsrInV6kxGP1.png)
Odpovědět
andyfierman 1 month ago
You need to draw a board outline round both boards and leave a gap between them on the two long edges for the stamp holes. You may need to manually place extra stamp holes.
Odpovědět
andyfierman 1 month ago
How are you doing the panelization? Does the advice from JLCPCBsupport in the following topic help? [https://easyeda.com/forum/topic/Definitive-panelization-procedure-for-SMT-assembly-2ffef94dabb140478997f8334d698a19](https://easyeda.com/forum/topic/Definitive-panelization-procedure-for-SMT-assembly-2ffef94dabb140478997f8334d698a19)
Odpovědět
Tone Electronix 1 month ago
@andyfierman > _You need to draw a board outline round both boards and leave a gap between them on the two long edges for the stamp holes._ They already have outlines, in both boards. And I tried leaving a gap. Didn't work. Look: ![image.png](//image.easyeda.com/pullimage/daJaASlH4IVhaGXy0ccftryhFkaT9f8OIMbbEKhG.png) > _You may need to manually place extra stamp holes._ How do you do that? Is there a button tool in easyEDA to do it? I thought it was  automatically done. I tried to move the stamping it creates to no avail. > _How are you doing the panelization?_ Selecting this menu and hitting "Apply": ![image.png](//image.easyeda.com/pullimage/Ocf0Yb8lIFm3kz932h6ToSMRqeN5046IfIvd8UcZ.png) <br> <br> <br> <br>
Odpovědět
Pro přidání komentáře se musíte Přihlásit nebo Registrovat
goToTop
你现在访问的是EasyEDA海外版,使用建立访问速度更快的国内版 https://lceda.cn(需要重新注册)
如果需要转移工程请在个人中心 - 工程 - 工程高级设置 - 下载工程,下载后在https://lceda.cn/editor 打开保存即可。
有问题联系QQ 3001956291 不再提醒
svg-battery svg-battery-wifi svg-books svg-more svg-paste svg-pencil svg-plant svg-ruler svg-share svg-user svg-logo-cn svg-double-arrow
We use cookies to offer you a better experience. Detailed information on the use of cookies on this website is provided in our Privacy Policy. By using this site, you consent to the use of our cookies.